Building and Testing a Backyard Solar Power System
Over the past year, I’ve been experimenting with a small-scale solar power system in my backyard. The goal was to test viability, ease of installation, and how practical it would be to run real-world loads like my personal workstation. Along the way, I gathered a lot of useful insights—from system sizing to cosine losses to evaluating rooftop installation practices.
Prototyping and System Testing
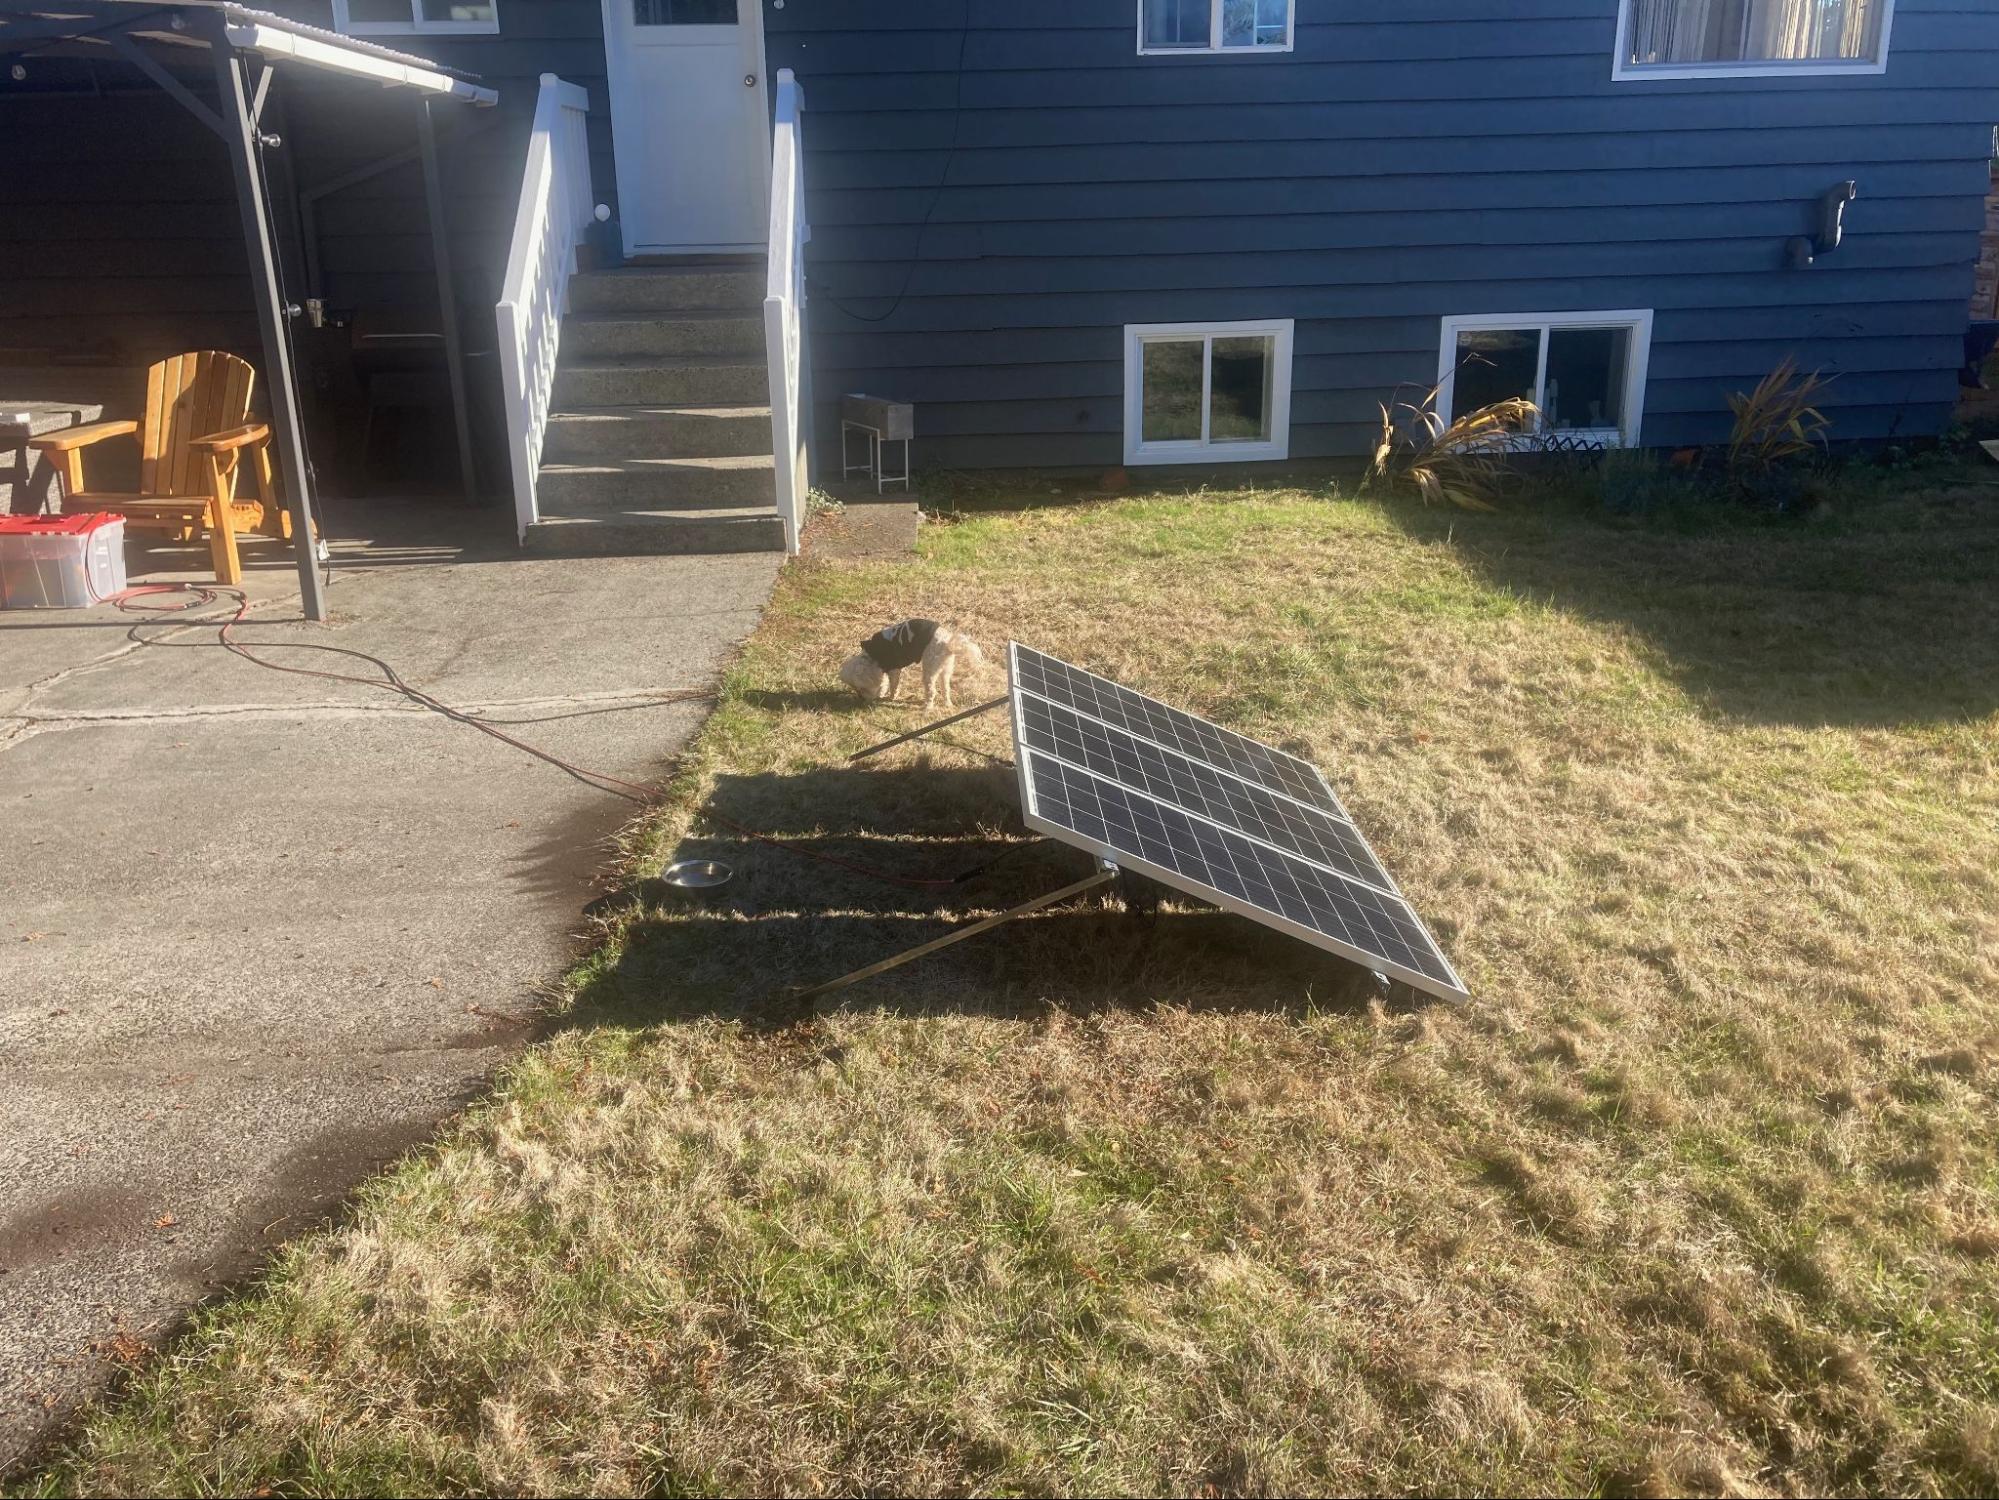
I started the experiment by laying out a single HQST 100W RV solar panel in the backyard and connecting it to a Victron 75V/15A MPPT charge controller. I was only measuring about 70-75W max at peak sun positions. This is likely due to a confluence of optimization issues such as temperature, a northern latitude and panel positioning.
I ended up ordering 2x more solar panels to increase my output, at this point I was maxing out at ~192W. This was lower than the expected ~220W, the root cause was the 15A MPPT limit coupled with the low battery voltage.
With only 4x LiFePO4 cells the nominal voltage is 12.8V and at 15A that limits the system to 192W. Additional LiFePO4 cells were purchased and added to the system, the Victron MPPT controller can charge up to a ~30V battery so I added another set of 4x cells in series to bring the nominal voltage up to 25.6V. This increased the power output of the system by dropping the current output required by the MPPT controller.
Finally in early summer 2024, the system reliably produced enough power to continuously run my workstation—computer and monitors included—throughout sunny summer days.
Understanding Cosine Loss
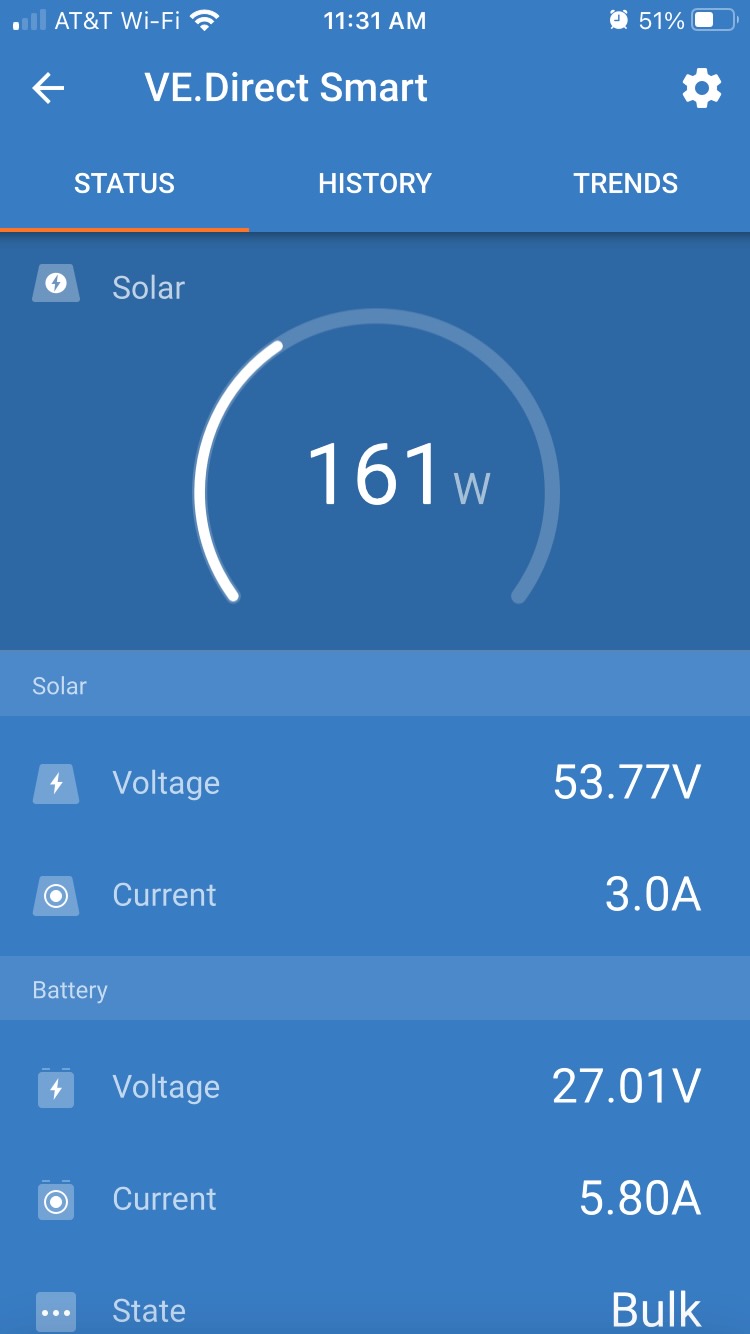
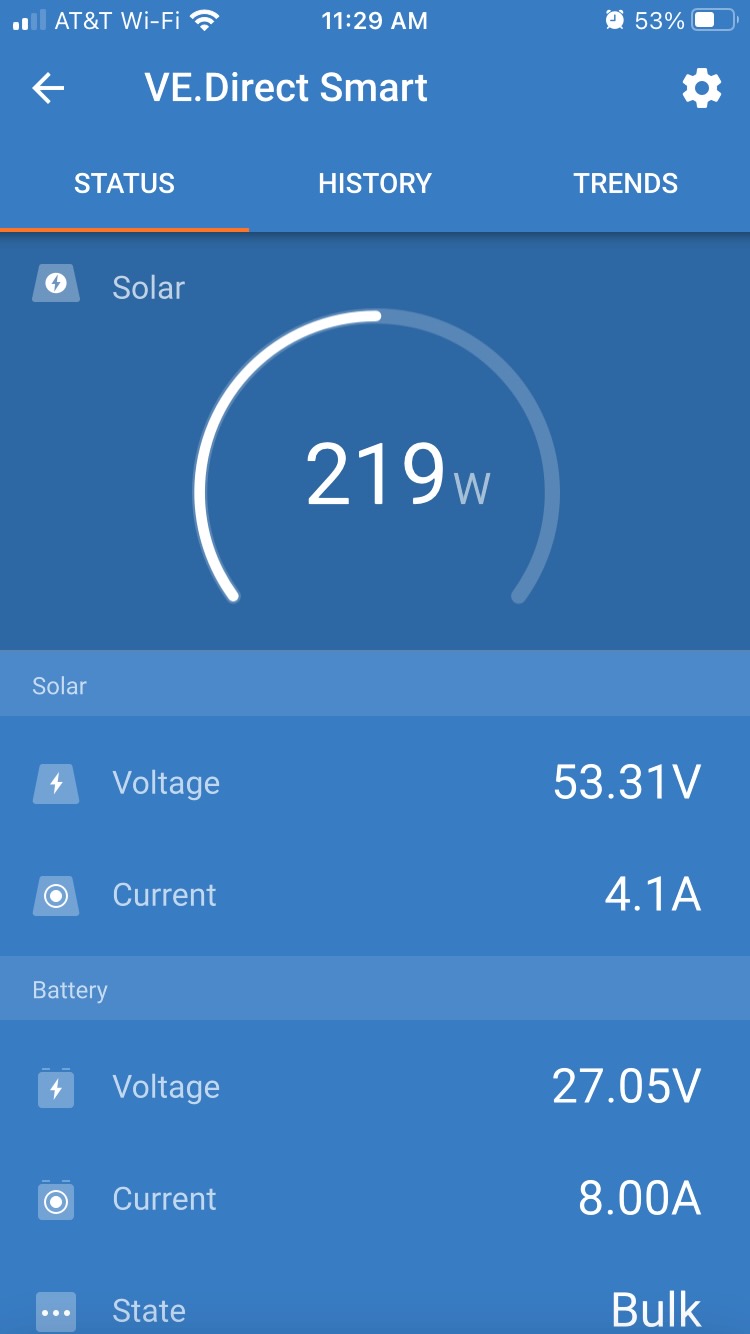
In late fall, I conducted a cosine loss test when the sun was at a much lower altitude (21°). With the panels positioned nearly flat, the system generated 161W of power. When I adjusted the panels to directly face the sun, power output jumped to 220W—essentially matching the peak power I had observed during midsummer. This test highlighted the importance of panel angle for maximizing energy collection, especially during seasons with lower sun positions.
At lower sun altitudes, increased air-mass index (AM) also becomes a factor which basically is a calculation of how much air there is in the sun’s path to the panels. However, when comparing this test in the fall to my peak power in mid-june, it did not appear to have a significant effect. The panels will be mounted in the same postion all year so it will be interesting to compare the effects of AM on the peak power throughout the year.
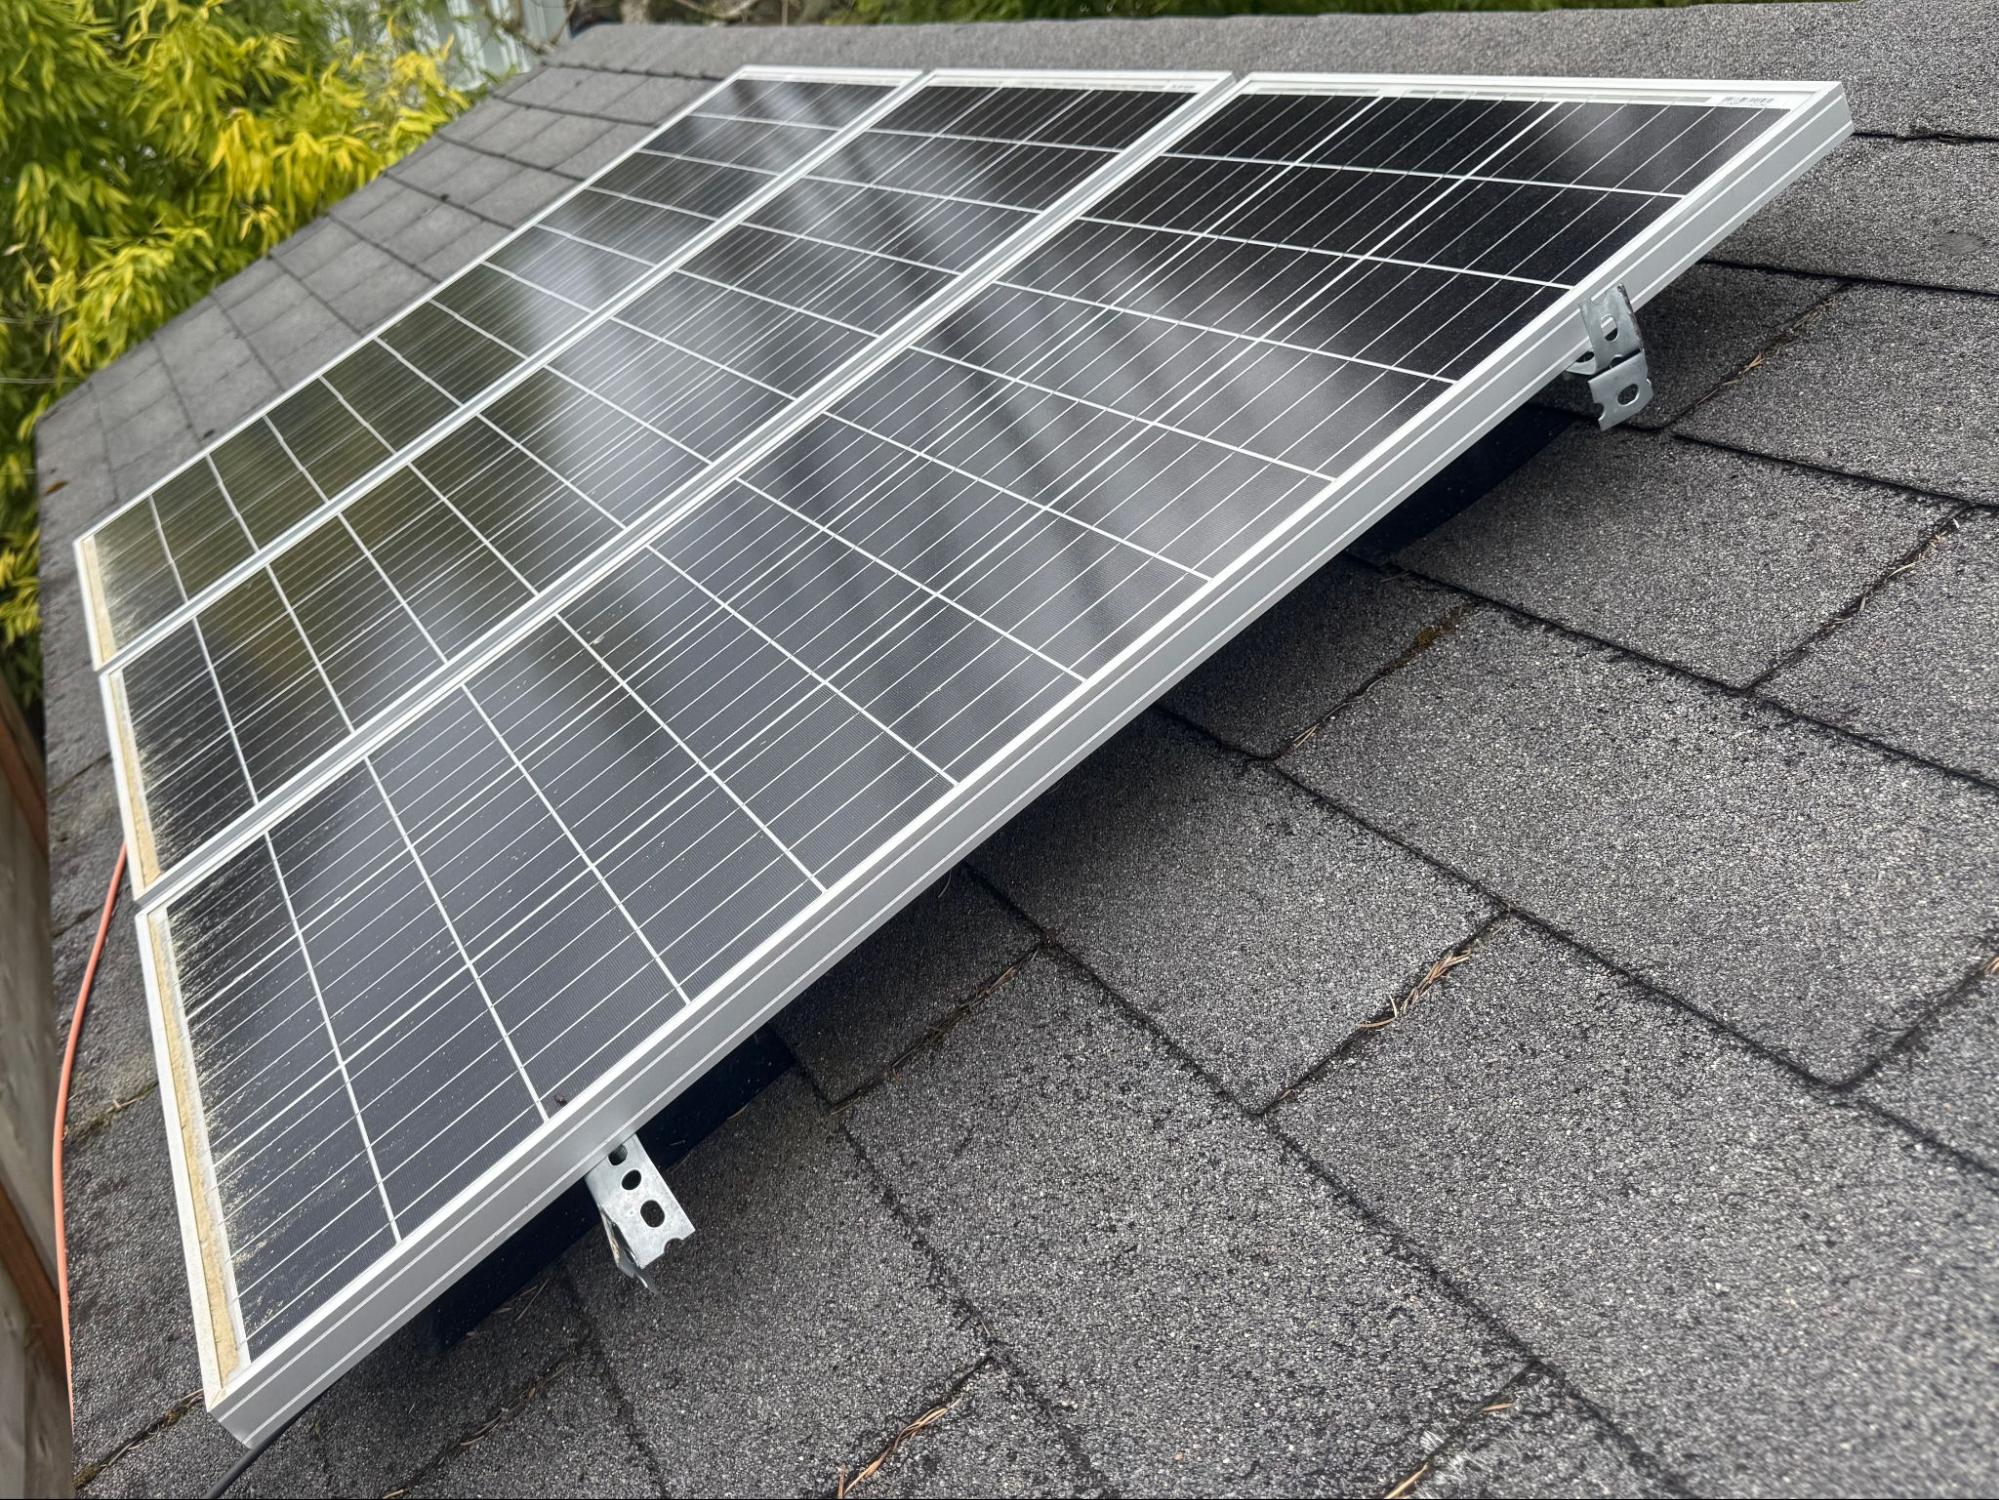
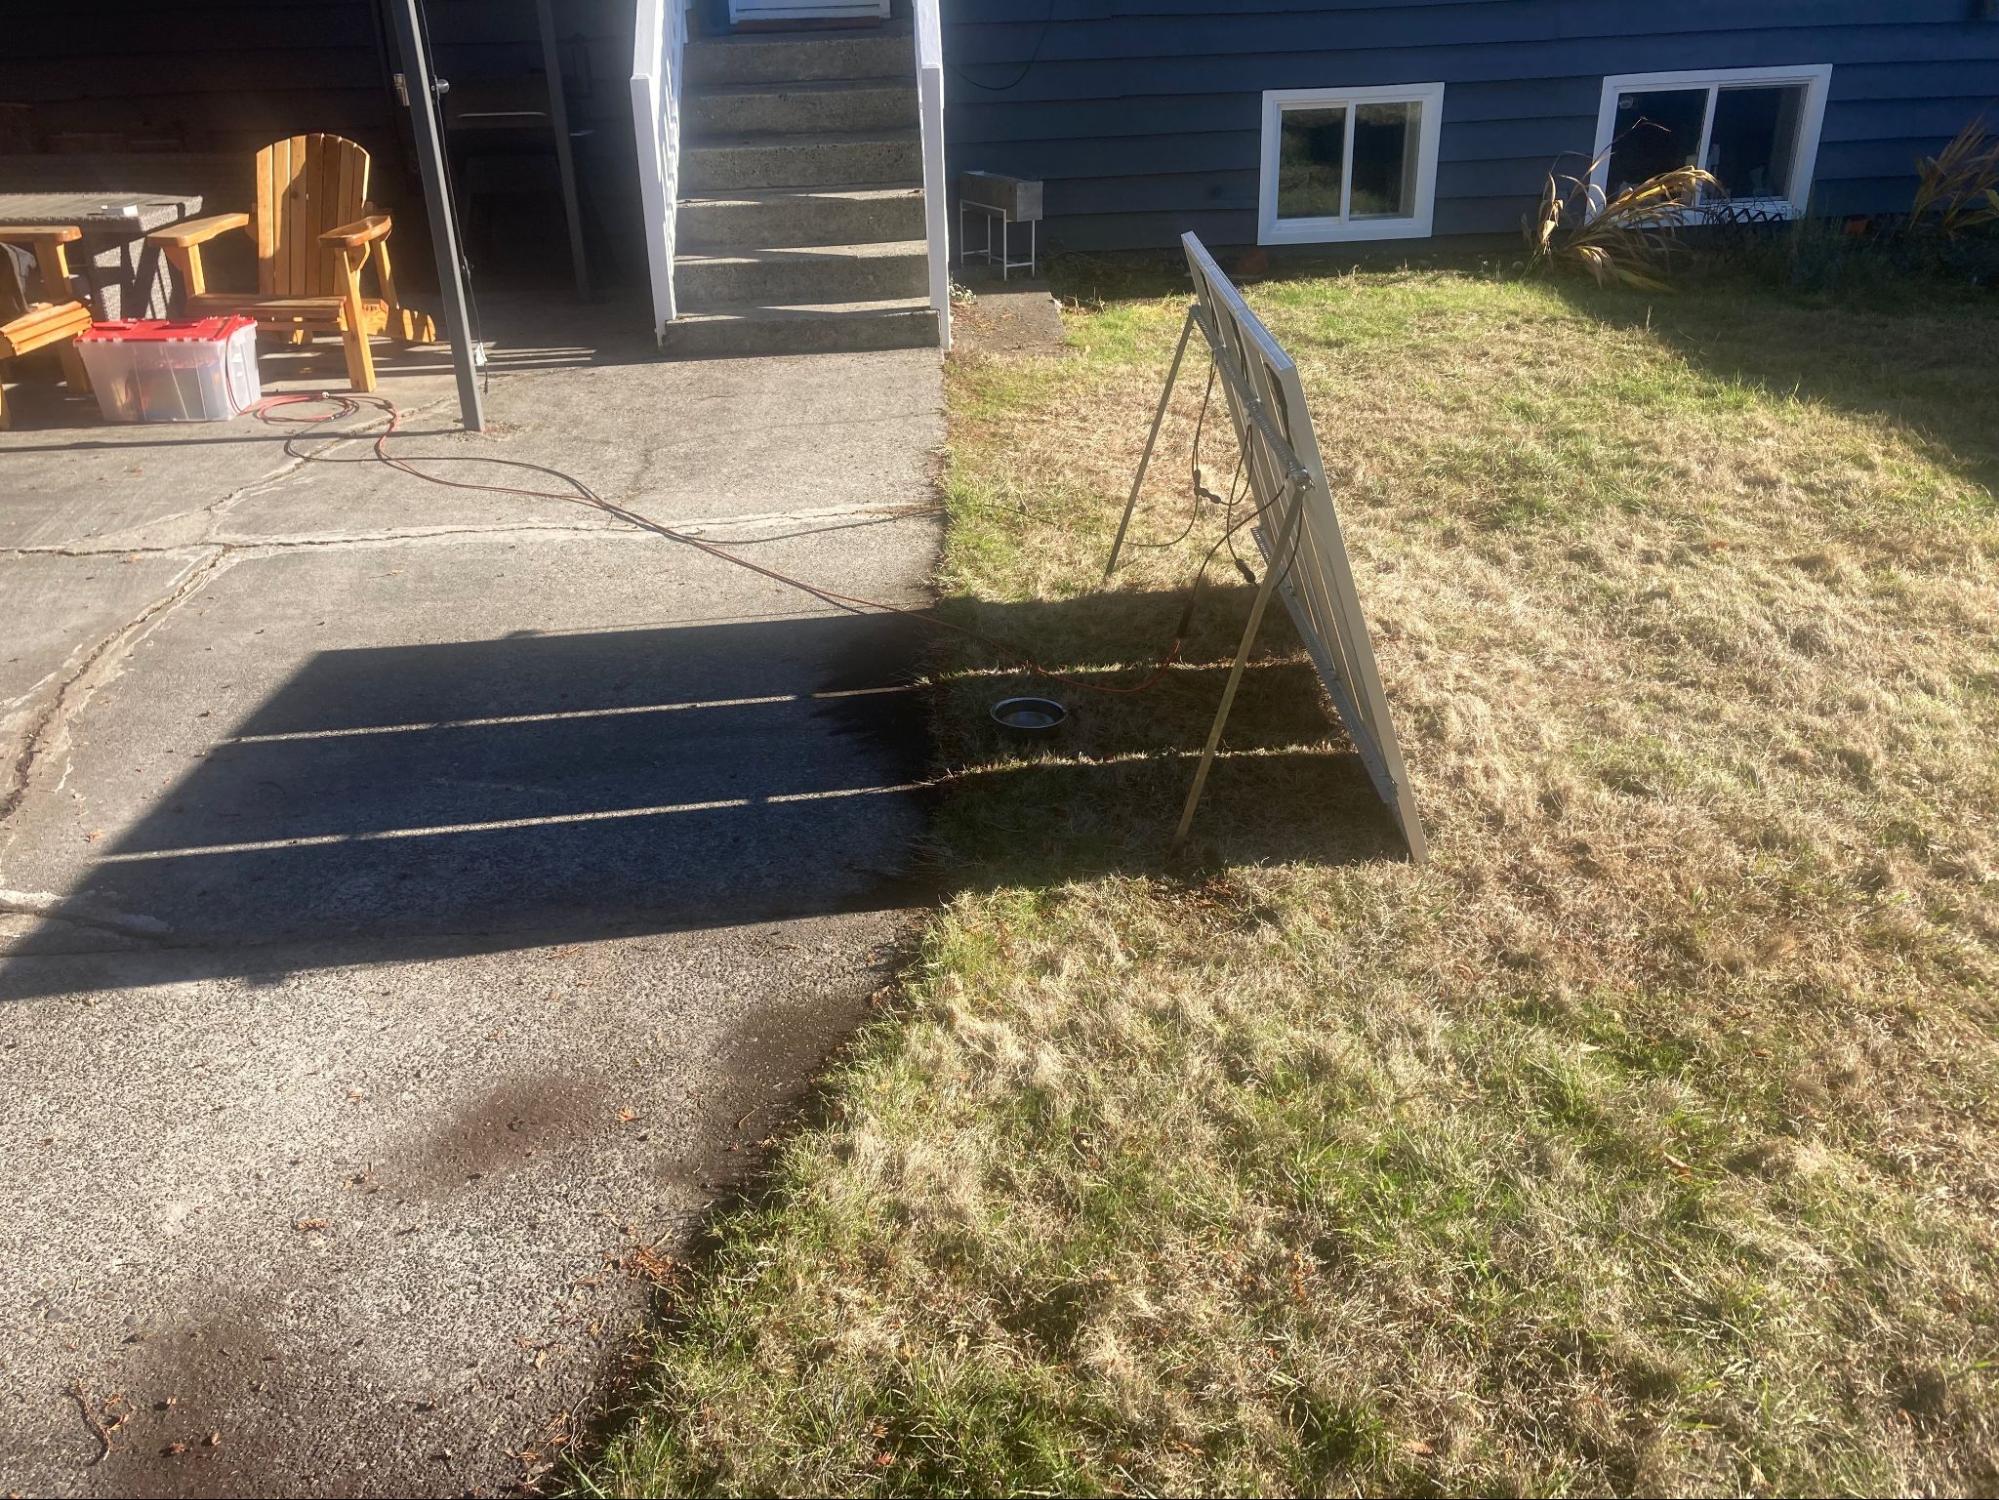
Roof Installation and Mounting
Since installation costs typically make up the bulk of solar system expenses, I took careful consideration when mounting the panels on my shed roof. I attached the panels together using angled aluminum and secured them to the roof with sturdy L-brackets.
For waterproofing, I used metal “flashing shingles” slipped under the roof shingle. The L-brackets and shingles were fastened directly to the rafters using 3.5-inch lag bolts (⅝" diameter), sealed thoroughly with roof cement. To locate the rafters accurately, I used a screw to probe from the roof surface—any missed holes were plugged and later covered by the flashing. This setup has now been through a full winter without any signs of leakage.
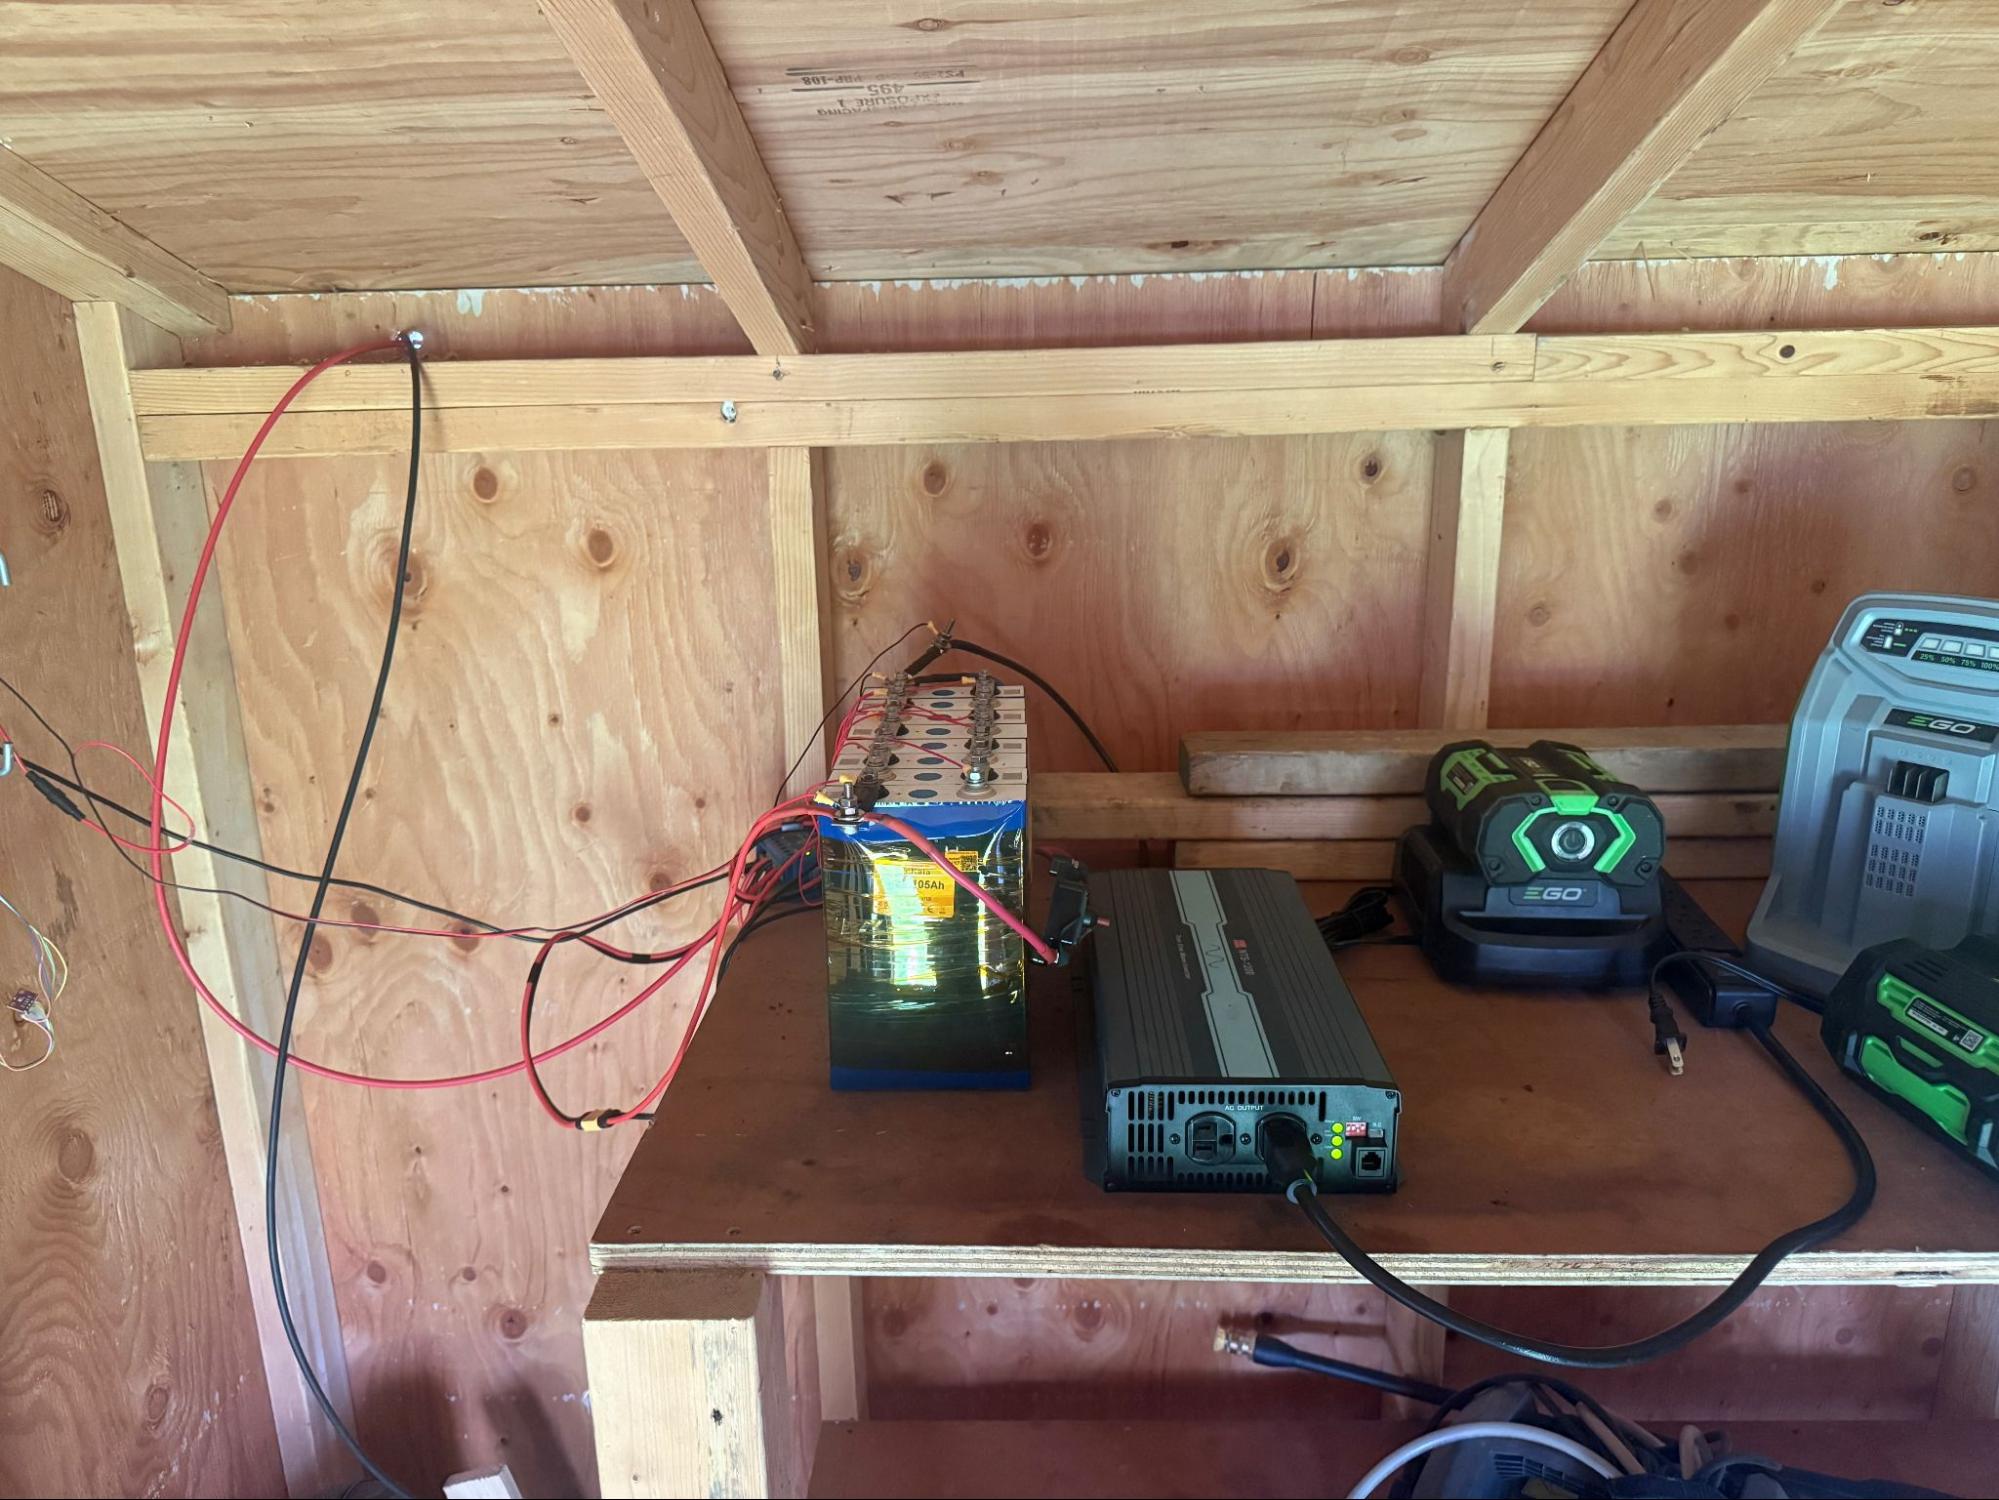
Safety Considerations
Safety was a primary concern throughout the installation. I incorporated several protection elements:
- In-line circuit breaker for the 24V power feeding the AC inverter
- 200A fuse for the battery
- Voltage and current protection via a Battery Management System (BMS)
The LiFePO4 chemistry is also inherently safer than standard lithium ion batteries. With improved thermal stability they are less likely to go into thermal runaway like li-ion.
Home Assistant Integration
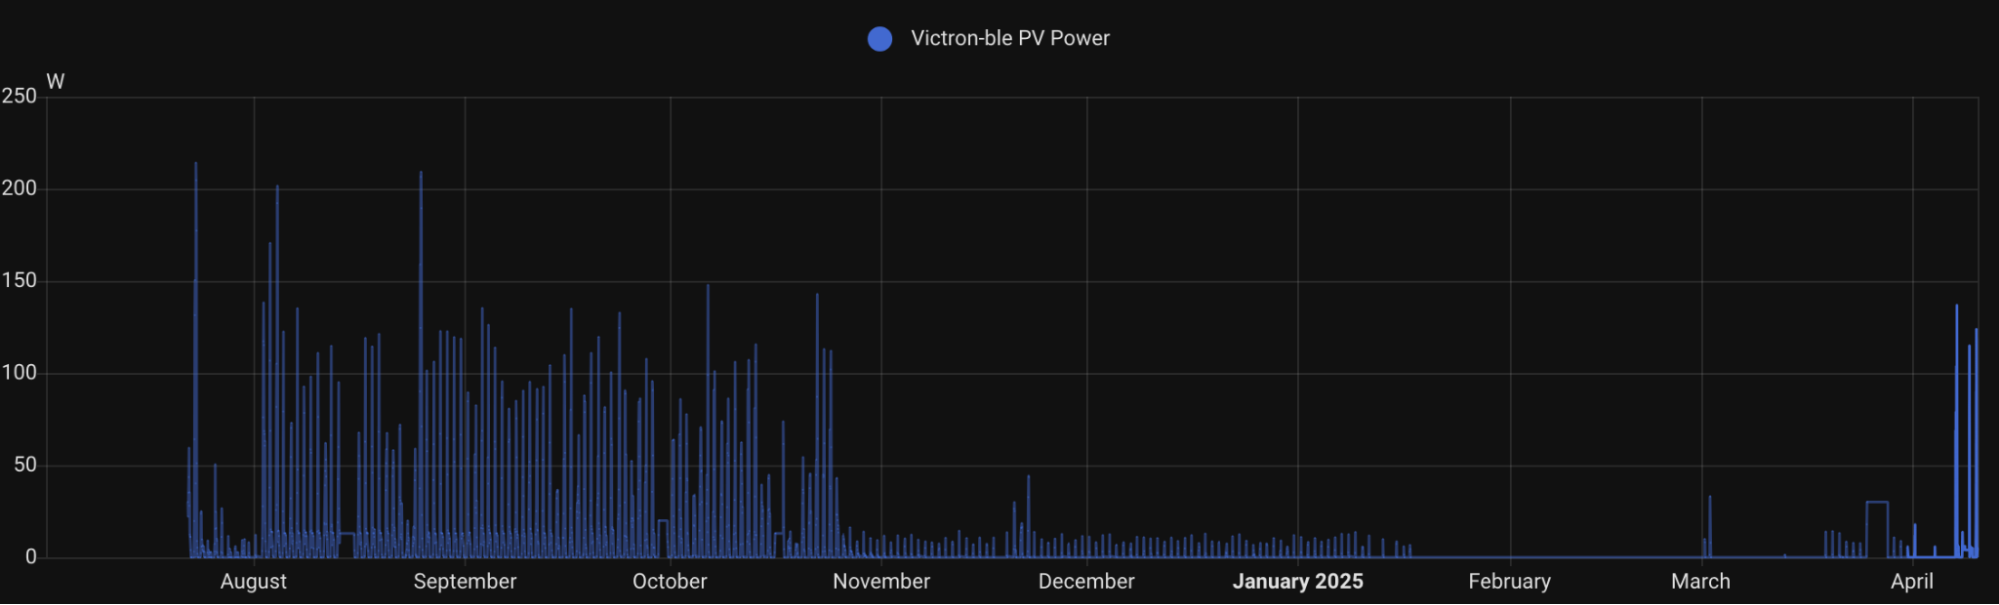
To monitor system performance, I leveraged the Victron Bluetooth module to access controller data. An ESP32 serves as a bridge, connecting the Victron Bluetooth data to my Home Assistant installation running on my home network. This setup allows for easy access to a comprehensive logging system and performance monitoring.
Cost Evolution and Savings
Another interesting aspect of this solar endeavor is the trend in renewable energy costs. When I first purchased batteries in September 2021, I paid $175 for four 100Ah cells. Fast forward to October 2024, and a comparable set cost just $123—representing a 30% price drop over three years.
The solar panels tell a similar story. My first panel was purchased from Amazon in December 2021 for $90. I added two more HQST panels in March 2022, paying $85 each. Today, those same HQST 100W panels cost just $59 on Amazon, or $50 directly from HQST—a remarkable 33-40% reduction in just three years.
In 2022, my total investment for eight battery cells and three solar panels came to $610. If I were building the identical system today, it would cost only $396. This dramatic price reduction highlights how renewable energy technology is becoming increasingly accessible for home projects.
Future System Improvements
My current setup has plenty of room for expansion and optimization. At peak sunlight, the system generates about 220W, charging the batteries at only 8A—well below the 15A capacity of my MPPT controller. This unused headroom presents an opportunity to add another set of three panels.
Theoretically, the system could output up to 384W (8 × 3.6V × 15A), significantly increasing charging capacity and available power. With current prices, adding three more panels would cost approximately $150. The primary challenge wouldn't be the cost but figuring out where and how to mount them on the limited roof space.
I'm also looking to make better use of generated power. Currently, the system only powers lawn and garden tools from the shed, leaving much of the generated electricity unused during sunny periods. For now I am okay with keeping the batteries charged for use in case of a power outage.
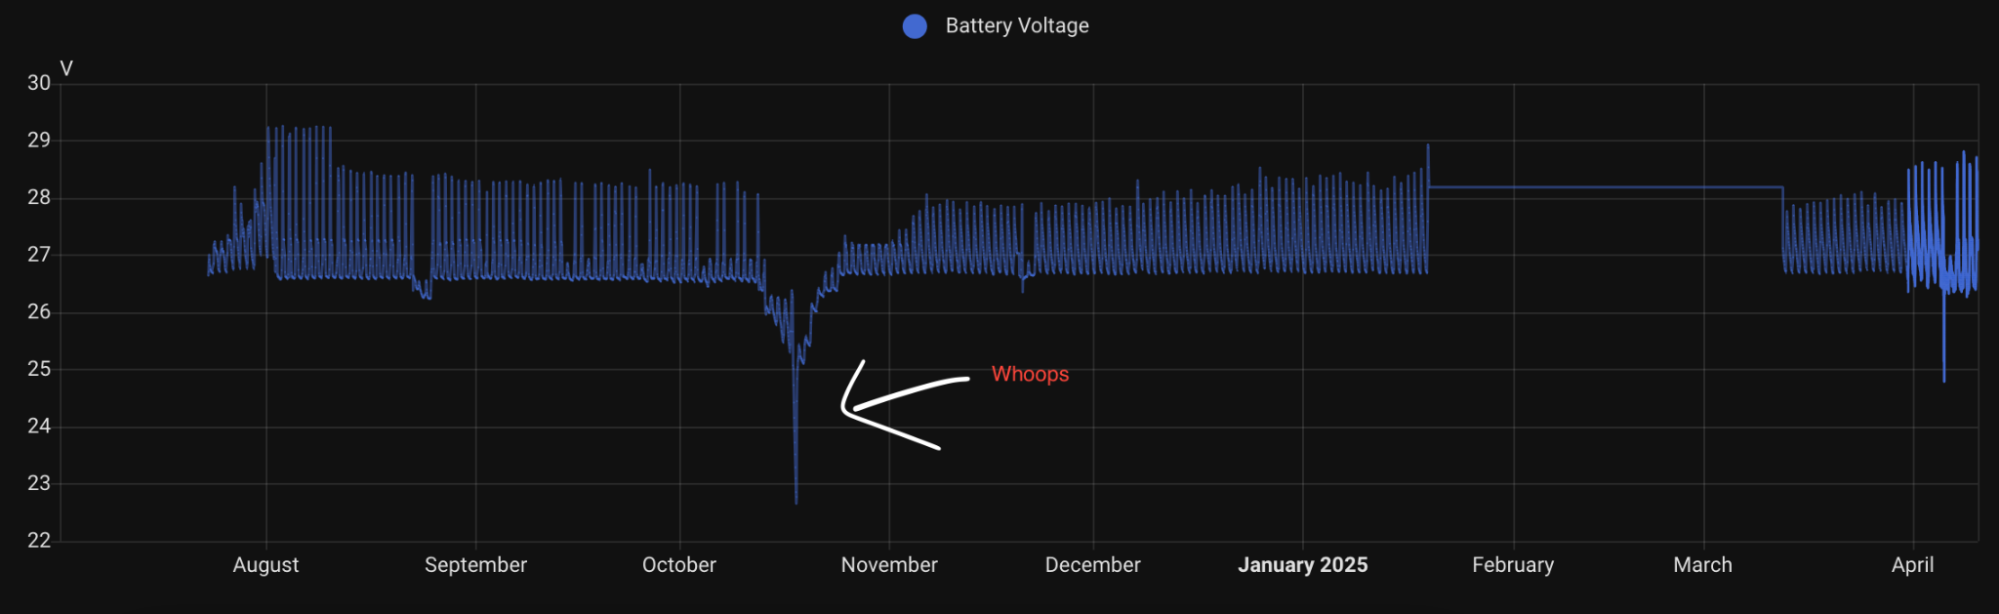
A nice quality of life improvement would be adding an automatic charge cut-off system for the LiFePO4 batteries. These batteries can be damaged when charged at freezing temperatures, and currently, I need to manually disconnect them during winter months when the weather starts to flirt with freezing temps during the day. Disconnecting the batteries then allows them to self-discharge and if the voltage gets too low, then the cells can be damaged. An automatic temperature-sensitive cut-off switch would allow me to keep the batteries connected through winter without concern which, in turn would keep my batteries topped up as they could still be charged when the temp rises later in the day.
These improvements would transform my modest solar setup into a more efficient, year-round power solution with minimal additional investment.